An Automatic Radar Plotting Aid (ARPA) is a vital navigational system that enhances radar capability by automating the detection, tracking, and analysis of multiple targets.
Installed on most SOLAS-compliant ships, ARPA empowers deck officers to make informed, real-time decisions to avoid collisions and improve situational awareness-especially in congested or restricted waters.
Unlike conventional marine radar, ARPA processes the radar echoes into actionable data, including target course, speed, CPA (Closest Point of Approach), and TCPA (Time to CPA).
It’s not just a radar- it’s your digital lookout.
📡 Radar vs ARPA: Know the Difference
| Feature | Radar | ARPA |
| Function | Detects range and bearing of targets | Tracks, processes, and interprets target movement data automatically |
| Display | Shows raw radar echoes | Adds vectors, CPA/TCPA, and collision alerts |
| Target Tracking | Manual plotting using plotting sheets | Continuous automatic tracking and updating |
| Decision-Making | Requires manual calculations | Provides instant maneuver insights and trial maneuvers |
🧭 Key Functions and Purpose of ARPA
ARPA goes beyond visual detection. It’s designed to:
- ✅ Track vessels automatically to reduce observer workload.
- ✅ Predict collision risks through vector analysis.
- ✅ Display real-time information such as CPA, TCPA, target speed/course, and past movement.
- ✅ Alert watchkeepers with alarms for potential close-quarter situations.
When used correctly, ARPA significantly improves bridge decision-making and ensures the safe navigation of your vessel.
⚠️ Important: ARPA is only as effective as the person operating it. Familiarity with its functions is mandatory for all Officers of the Watch (OOWs).
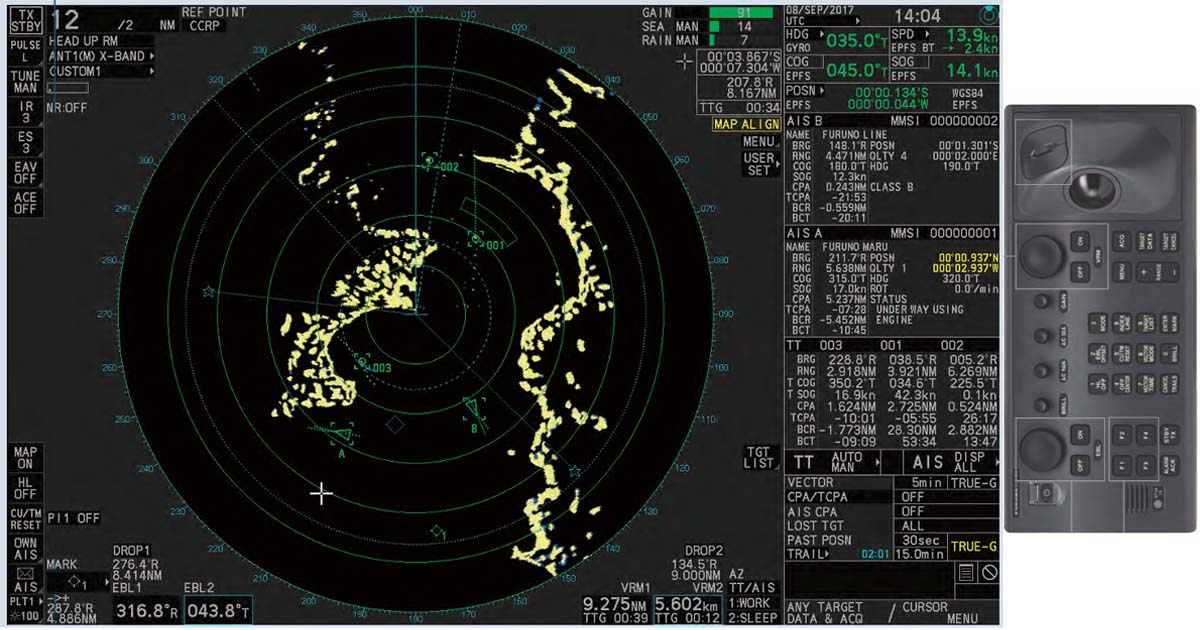
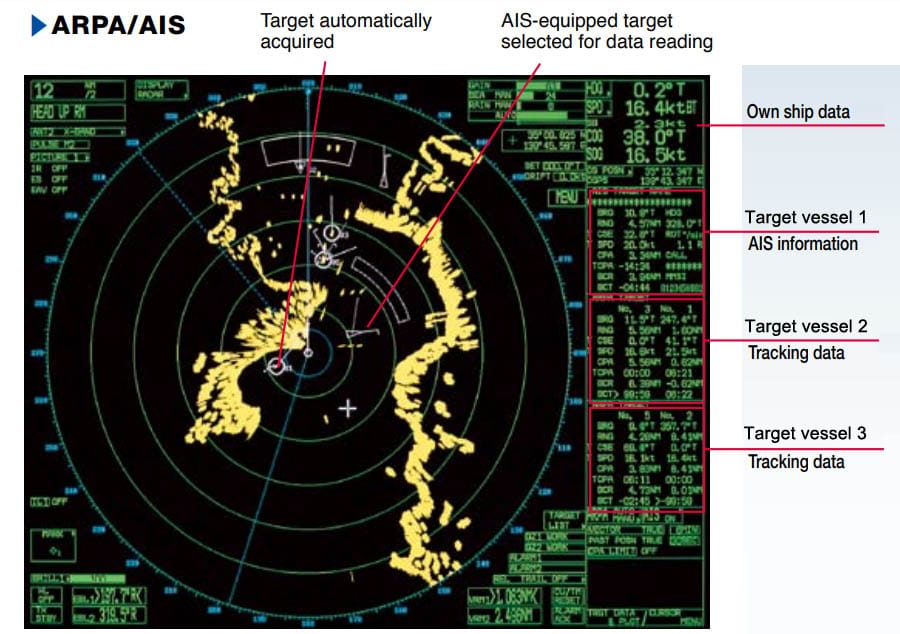
🛠️ 1: Display Indications
Display indications show all visual elements on the radar screen, including:
- Own ship’s position
- Range rings
- Heading line
- Bearing markers
- Cursor and menu layout
Familiarity with what’s being shown is essential before using ARPA effectively. Misinterpreting this data could lead to navigational errors.
🖥️ 2: Display Modes and Orientations
Understanding display modes helps interpret how your ship and targets move on the screen.
🌀 Relative Motion Display
- Own ship appears stationary; other vessels move relative to it.
🌍 True Motion Display
- All vessels, including own ship, move in real time.
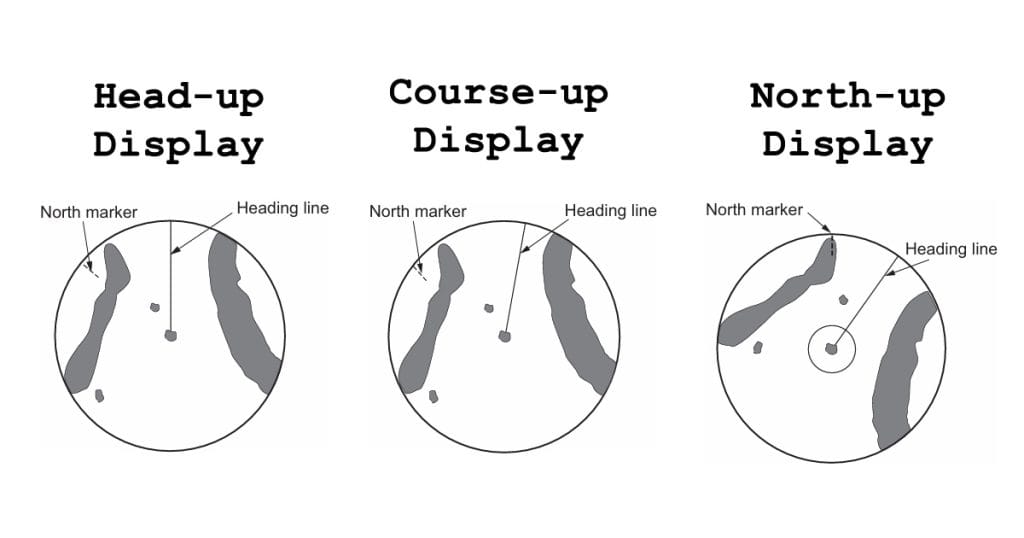
📐 Three Display Orientations:
- Head-Up: Ship’s current heading is always at the top.
- Course-Up: Shows the set course at the top.
- North-Up: North is fixed at the top of the screen.
🧠 Bridge Tip: Most navigators prefer North-Up for consistent orientation with nautical charts and ECDIS.
🔍 3: Range Scaling
Adjusting the radar range scale helps focus on specific navigation needs.
Choose short ranges for close-quarters maneuvering and longer ranges for open sea tracking.
- Use short range (e.g., 3–6 NM) when navigating near coastal or congested areas.
- Use long range (e.g., 12–24 NM) during ocean passage to track distant targets.
🎯 4: Target Acquisition and Tracking
ARPA can automatically or manually acquire targets within a defined range. Once acquired, the system tracks their:
- Course over ground (COG)
- Speed over ground (SOG)
- Closest Point of Approach (CPA)
- Time to CPA (TCPA)
Deck officers must also know how to cancel acquisition or manually select/deselect targets when needed.
🔁 5: Vector Display (Relative vs True)
Vectors display a vessel’s predicted movement based on speed and heading. There are two types:
- True Vectors: Show actual target movement over the ground.
- Relative Vectors: Show how targets appear to move relative to your vessel’s motion.
Proper vector interpretation allows for early decision-making to prevent collisions.
⚓ Training Reminder: Always check the vector time length. Default is usually 6 or 12 minutes.
🚨 6: Alarm Systems
Modern ARPA units are equipped with audiovisual alarms that alert the Officer of the Watch when:
- A target’s CPA or TCPA falls below preset thresholds
- A vessel enters a guard zone
- An ARPA tracking error or loss occurs
- Anchor watch is triggered when the vessel starts dragging
Bridge teams must understand how to customize alarm parameters to suit different navigation scenarios especially in confined or high-traffic areas.
Proper alarm setup avoids false alerts while ensuring you never miss a genuine collision risk.
🧠 Tip: Alarm configuration is often integrated with CPA/TCPA thresholds under COLREG Rule 7 (Risk of Collision).
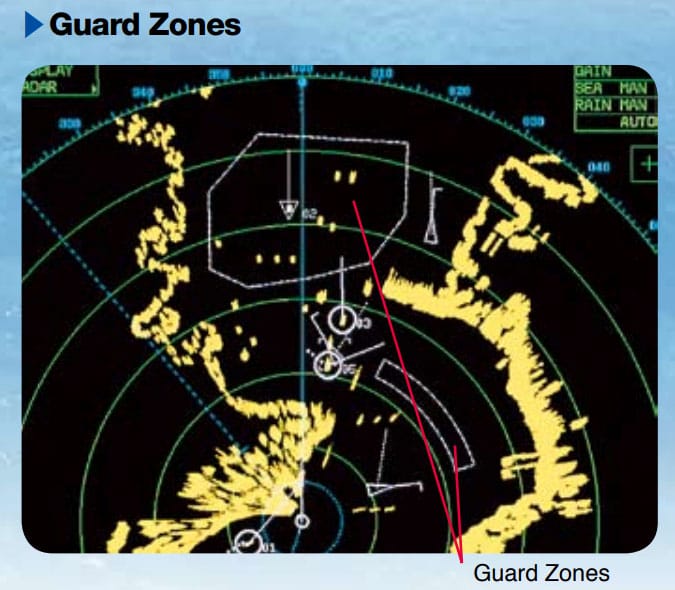
🛑 7: Guard Zones
Guard zones are user-defined areas on your radar screen. When any vessel enters this zone, ARPA can automatically:
- Acquire the target
- Display its movement vector
- Trigger a warning alarm
These zones are particularly useful during:
- Restricted visibility
- Coastal navigation
- At anchor, where your X-band radar might detect small crafts that S-band could miss
Most ARPA systems allow multiple guard zones with custom shapes and sizes, ensuring flexibility in different navigation environments.
📌 Bridge Practice: Use overlapping guard zones on different bands (X and S) to reduce blind spots.
🧪 8: Performance Monitor Test
The Performance Monitor (PM) checks whether the radar system, including ARPA, is functioning within manufacturer specifications.
To conduct a PM test:
- Press the PM button on the ARPA console (varies by model)
- The radar range resets to 24 NM
- Calibration rings or arcs appear on the display
- Measure using Variable Range Markers (VRM)
If the results don’t match the manual specs, the magnetron may need replacement, or service engineers should be called.
Always refer to your unit’s manual before running this test.
⚠️ Maintenance Tip: Conduct PM tests monthly or after heavy weather, vibration, or port stay.
⚖️ 9: Trial Maneuver
Trial maneuver is one of ARPA’s most powerful safety features. It allows deck officers to simulate course or speed changes and see:
- How all tracked targets would respond
- If the maneuver reduces the risk of collision
- The new CPA/TCPA values after adjustment
You can simulate:
- Altering course to starboard or port
- Speed reduction or acceleration
- Course and speed changes combined
This tool is especially valuable when crossing TSS (Traffic Separation Schemes), overtaking, or navigating around fishing vessels.
⚓ Collision Avoidance Strategy: Use trial maneuver before altering course- never guess.
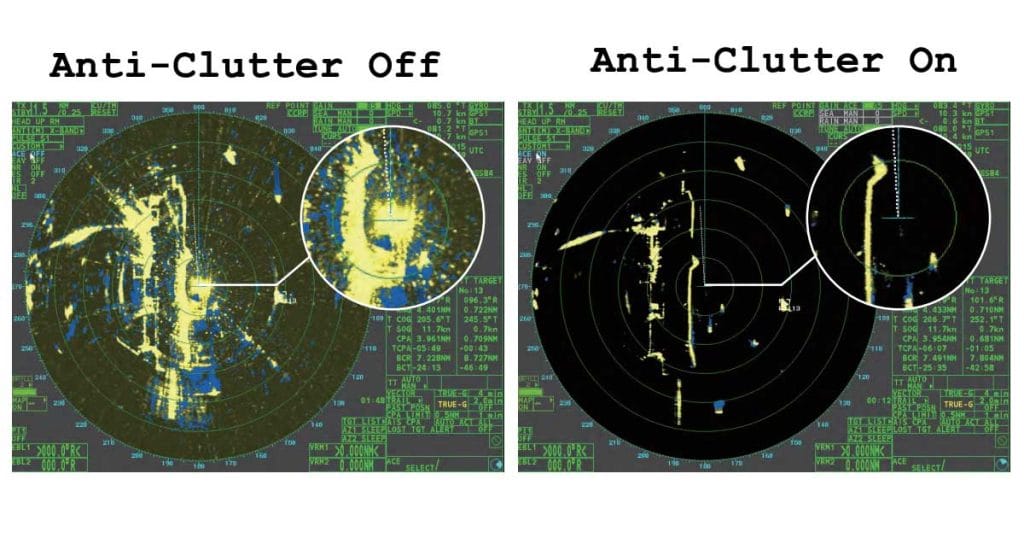
🌊 10: Anti-Clutter Features
Also known as clutter suppression or STC (Sensitivity Time Control), these features filter out unwanted echoes caused by:
- Sea waves
- Rainfall
- Atmospheric interference
Activating anti-clutter filters improves target visibility, especially in:
- Rough seas
- Heavy precipitation
- Low-visibility bridge operations
🧭 Seafarer Tip: Always fine-tune sea clutter and rain clutter individually based on environmental conditions. Not all radars auto-adjust accurately.
📡 11: AIS Interface
The Automatic Identification System (AIS) enhances ARPA by supplying vessel information like:
- MMSI
- Vessel name
- Course and speed
- Navigation status
While radar detects echoes, AIS detects even those vessels that may not generate strong radar returns, like small fishing boats or yachts.
When integrated with ARPA:
- AIS targets appear even without radar echoes
- Identification of vessels becomes faster and more accurate
- Situational awareness is dramatically improved
⚓ Watchkeeping Best Practice: Never rely solely on AIS or radar. Use both for a cross-verified collision avoidance picture.
📏 12: Electronic Bearing Lines (EBL) and Variable Range Markers (VRM)
These are your manual measuring tools on ARPA:
- EBL: A dashed line from own ship to measure target bearings
- VRM: An adjustable circle to measure target range
Most ARPA units have two EBLs and VRMs, controllable by rotary knobs.
Use them to:
- Double-check radar data
- Cross-reference CPA estimation
- Estimate wheel-over points before a course alteration
🧠 Bridge Drill Reminder: Use EBL and VRM when ARPA data appears questionable, or during training watches.
🧭 13: Waypoints Display
Modern ARPA units can load voyage routes from GPS or ECDIS, showing waypoints directly on the radar display.
This helps officers:
- Follow preplanned courses
- Monitor cross-track deviation
- Navigate safely in coastal waters
Even though setting waypoints is usually done by the 2/O, all deck officers must know how to:
- Load the waypoint route
- Activate waypoint tracking
- Monitor ARPA display alignment with voyage plan
🧑🏫 Cadet Training Note: Practice loading and verifying routes during bridge watchkeeping drills.
🌐 14: Ground and Sea Stabilization
Stabilization defines the reference system your radar uses to calculate target motion.
🌍 Ground Stabilization
- Uses GPS speed over ground and gyro heading
- Ideal when navigating near land or in current-affected areas
- Targets appear fixed to the earth’s surface
🌊 Sea Stabilization
- Uses log speed through water and gyro compass
- Suitable in open seas
- Accounts for ship movement relative to the sea
🧪 Operational Tip: Switch to ground stabilization when docking or navigating rivers. Sea stabilization can produce misleading vectors near land.
🔄 15: Off-Center Display
This function shifts your ship’s icon away from the center of the radar screen, giving more visibility in one direction, usually forward.
Use it to:
- Expand visibility ahead during coastal navigation or channel transit
- Focus on stern monitoring during towing or anchoring
- Avoid unnecessary range scale increase
📌 Usage Tip: Most navigators offset the ship slightly toward the bottom of the screen to widen forward visibility without changing radar range.
🎯 16: Target Data Display
ARPA presents essential information for each tracked target, including:
- Range (nautical miles)
- Bearing (relative or true)
- Course and Speed
- CPA (Closest Point of Approach)
- TCPA (Time to CPA)
These are typically shown in a dedicated target data panel beside the PPI (Plan Position Indicator).
Officers must verify this data against the ship’s movements and traffic conditions.
📚 Bridge Reminder: Always cross-check target data before altering course- especially when passing close-range vessels in TSS or anchorages.
⚙️ 17: Gain Control
Gain adjusts the sensitivity of radar echo amplification.
- Too low = weak or no target returns
- Too high = clutter and noise saturating the screen
Ideal Setting:
Increase gain until a light grainy background (like fine sandpaper) appears. This ensures maximum sensitivity without drowning valid echoes.
🧠 Best Practice: Adjust gain each watch or when range scales change to maintain optimal visibility.
💡 18: Brilliance Adjustment
Brilliance controls the brightness or intensity of the radar screen (CRT or LCD-based).
- Low brilliance = dim display, unreadable under sunlight
- High brilliance = overexposed screen, equipment wear
Modern ARPA systems often have separate brilliance settings for:
- PPI
- Trails
- Text overlays
- Target symbols
🔋 Maintenance Tip: Reduce brilliance at night to extend screen life and reduce bridge glare.
🕒 19: Tracking History and Echo Trails
🧩 Tracking History
Shows a record of past movements of each tracked target- helping the watch officer:
- Identify past maneuvers
- Detect erratic vessel movements
- Anticipate future trends
💭 Echo Trails
Simulate “afterglow” of past positions- drawn either:
- In true motion (over ground)
- Or relative motion (based on own ship’s movement)
🧑✈️ Collision Avoidance Tip: Activate echo trails in heavy traffic zones or near TSS entry points for better vessel trend analysis.
📴 20: Standby and Transmit (STBY/TX)
The STBY/TX button controls radar pulse emission:
- TX (Transmit): Radar is fully active, scanning and tracking targets.
- STBY (Standby): Radar is powered but not emitting- used when:
- In port or at anchor
- On tankers to comply with port regulations or ISGOTT
- Performing bridge maintenance
Switching to STBY conserves power and prolongs magnetron life.
⚓ Safety Note: Always resume TX mode before departure– especially when exiting anchorages or oil terminals.
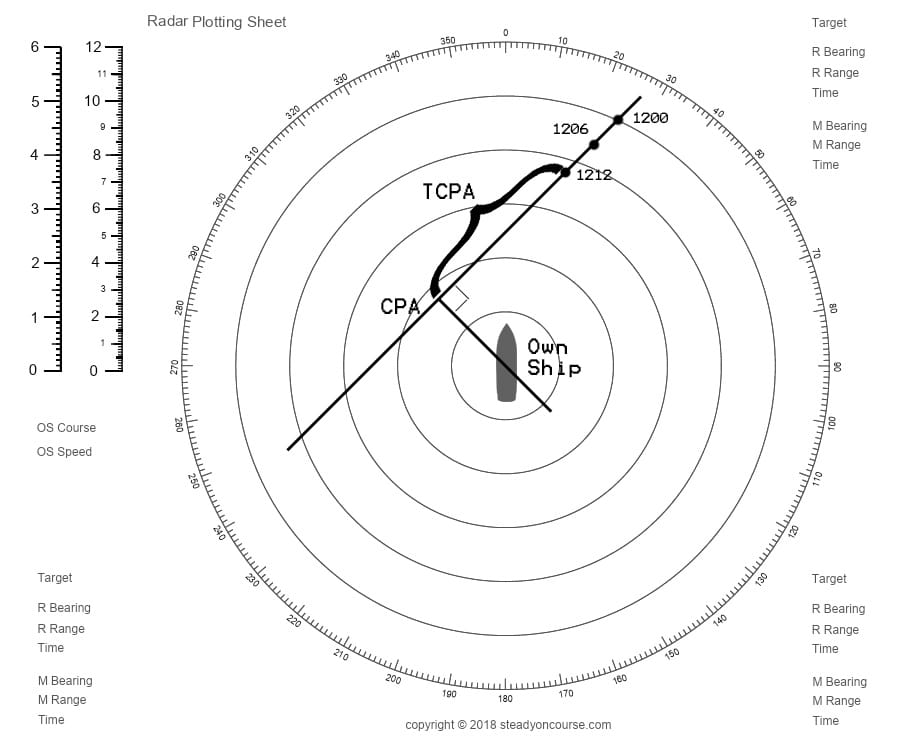
📜 Navigating Before ARPA: A Brief Throwback
Before ARPA, watchkeepers relied on manual radar plotting using:
- Plotting sheets
- Range/bearing observations every 3, 6, or 12 minutes
- Vector triangle calculations
In heavy traffic, plotting five or more targets was mentally exhausting and risk-prone. ARPA changed that.
Today, automated target tracking and collision prediction tools make watchkeeping smarter, faster, and safer.
🖼️ Bridge Memory: Some senior officers still keep plotting sheets onboard for emergency drills or fallback navigation training.
❓ Frequently Asked Questions (FAQs)
1. What is the main purpose of ARPA on ships?
To automatically track targets, analyze their motion, and help deck officers avoid collisions using real-time radar data.
2. What does CPA and TCPA mean in ARPA?
CPA is the Closest Point of Approach. TCPA is the Time to CPA. These values help officers decide if evasive action is needed.
3. Can ARPA replace manual plotting?
ARPA automates plotting, but officers should still know manual methods for training and fallback situations.
4. What’s the difference between radar and ARPA?
Radar detects objects using radio waves. ARPA builds on that by analyzing and displaying target motion, collision risk, and past/future trends.
5. Is it okay to rely solely on ARPA?
No. ARPA is an aid, not a replacement for good seamanship. Visual lookouts, AIS, and radar interpretation must complement its use.
🧭 Final Thoughts: Why ARPA Mastery Matters
Mastering ARPA isn’t just about knowing where to click- it’s about understanding how your ship interacts with the surrounding traffic.
Whether you’re transiting high-risk areas like the English Channel or navigating offshore anchorages, your knowledge of ARPA functions directly impacts:
- Your ship’s safety
- Your decision-making speed
- Your confidence as a bridge officer
⚓ Train regularly, question your assumptions, and use ARPA as the powerful tool it was designed to be.
🧑✈️ Want more bridge navigation guides? 👉 Send us a message or write a comment and I’ll drop it in your inbox!
May the winds be in your favor.
Leave a Reply